The Duplex Renovation

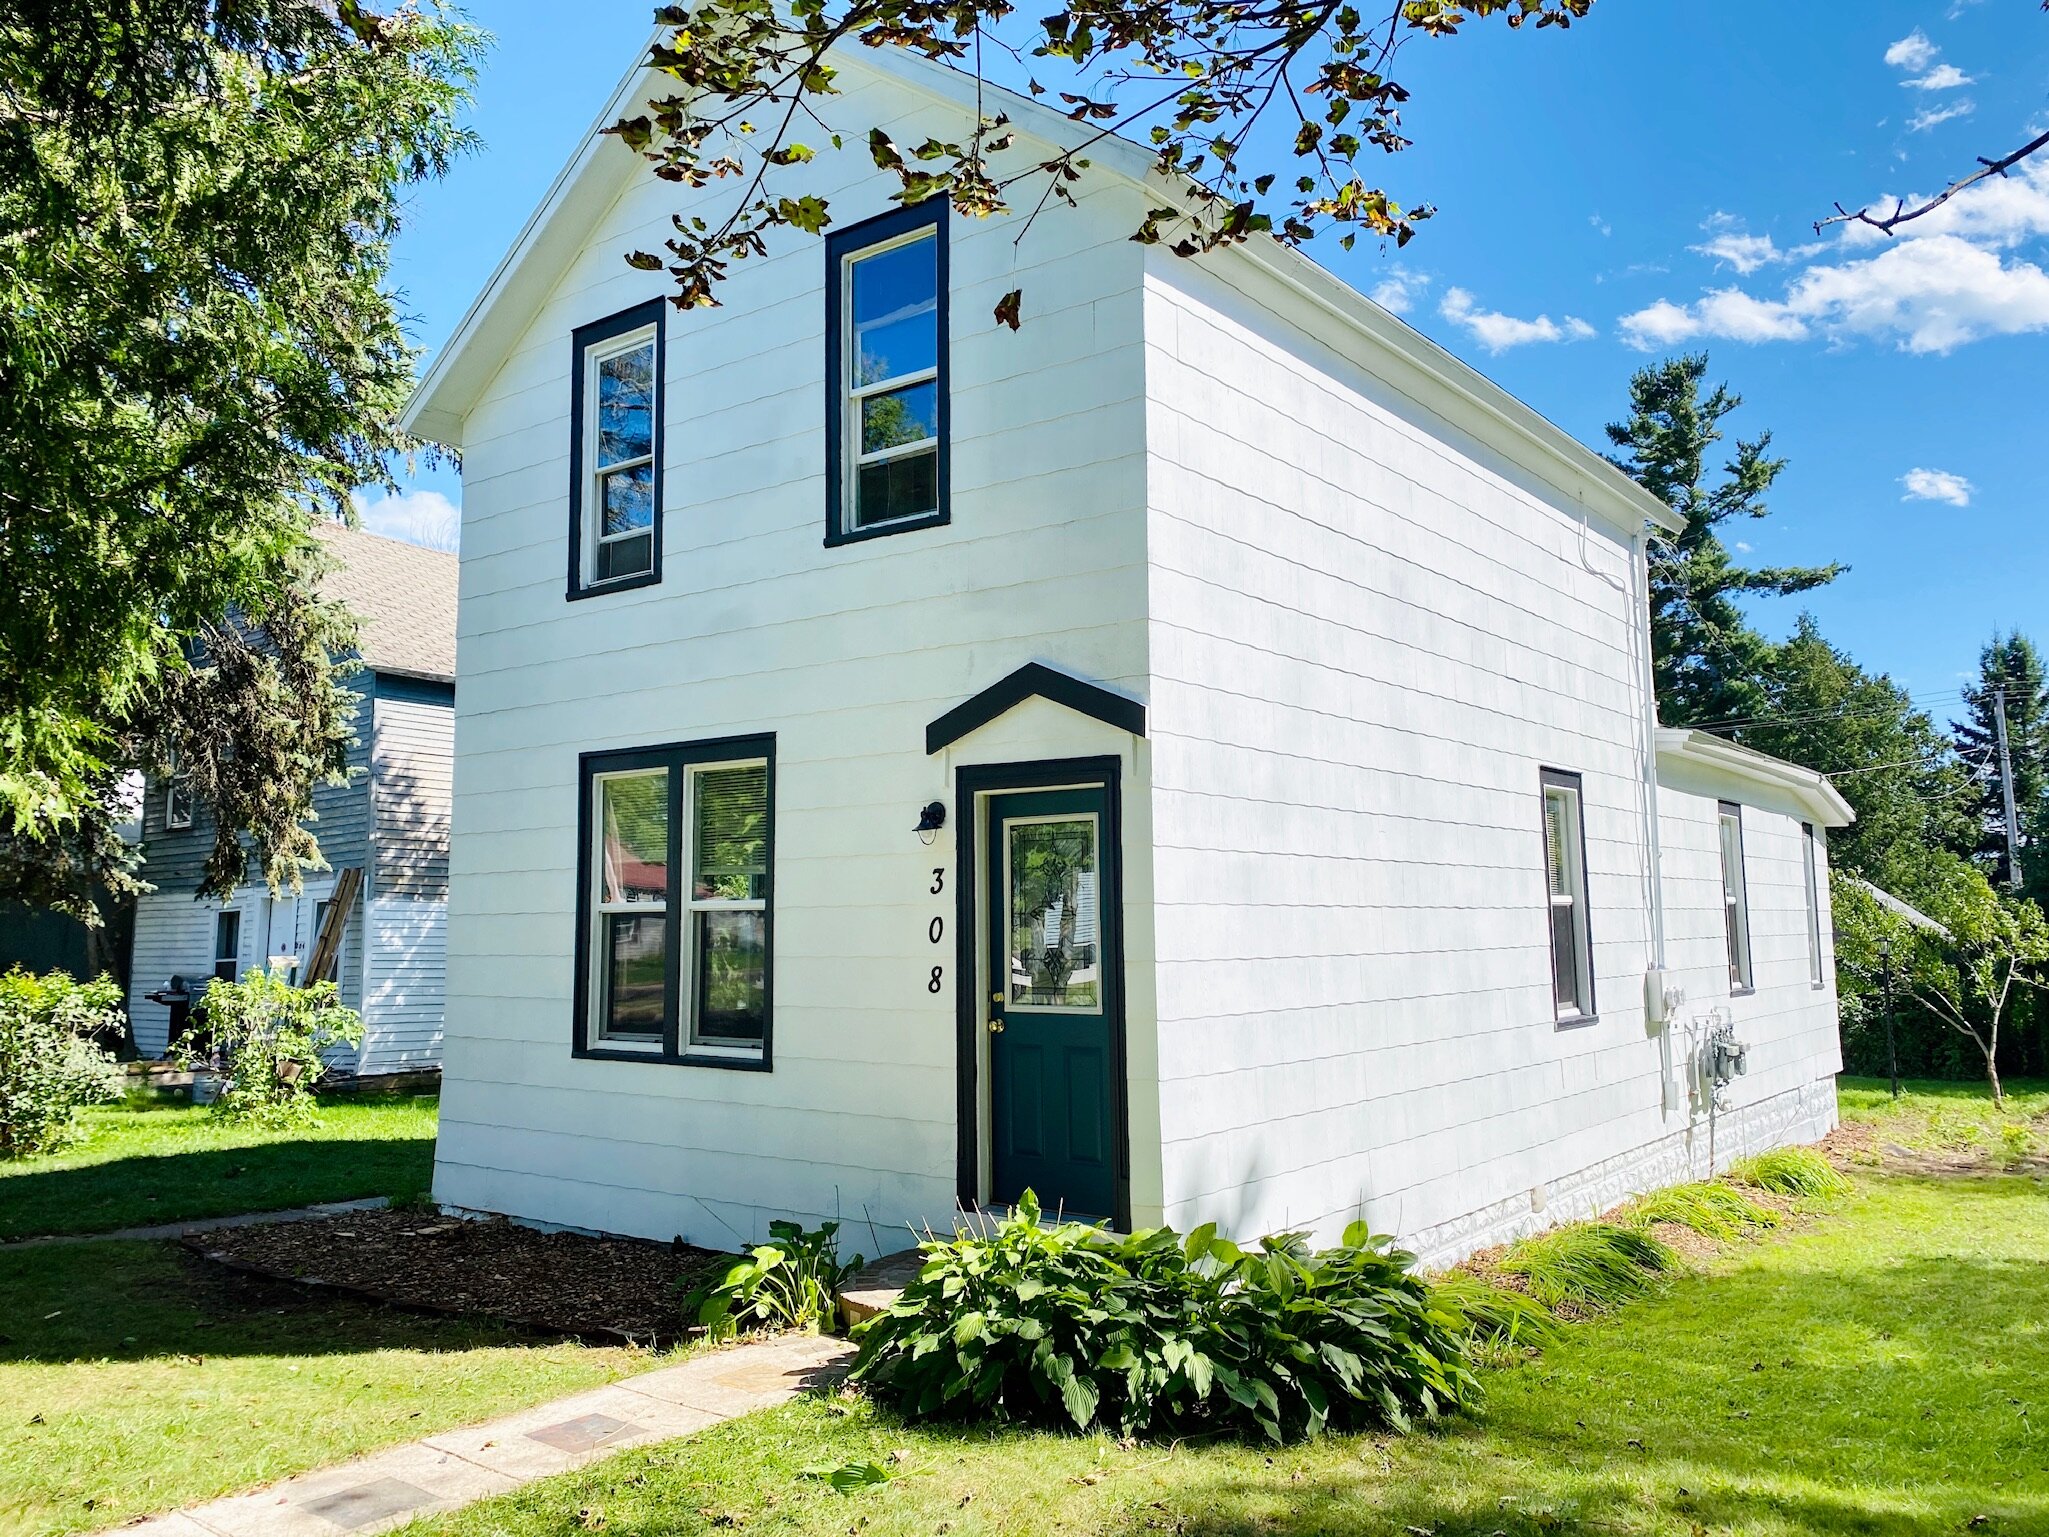
When we made the decision: move “home” to Wisconsin and family, the Lindsey Lakehouse wasn’t a thing. We had the dream, but not so much as an inkling that a house on the lake was a possibility. We initially planned on living in a one bedroom first floor apartment of a 100 year old duplex while we waited for our stars to align. Left essentially abandoned for 2 years, the house was not exactly a gem. A diamond in the rough? Maybe, but not quite. It was overgrown, filthy, and filled with spiders, chipmunks, and 100 years of interesting add-ons and quick fixes. Perfect project for an unemployed attorney, ready-to-pop prego, and 1 year-old human who were living on grandma’s couch, right? Why not. It had potential, and we had a vision. AND THEN the stars aligned and we found our forever home (hear the sweet sweet sound of the heavens opening up). So with that, the intention changed, but we were still set on loving on our little duplex and decided to turn it into our first little business venture as landlords.
Max and I grew up familiar with land-lording. Both of our families owned multiple rental properties over the years (another blog will talk about how regular old middle class families made that happen on a budget). We genuinely appreciate the opportunity to both have an investment in our future and (someday hopefully) passive income, and also to provide comfortable housing in our community. They take a lot of work though. This house has gone from drab to not-quite-drab. They say you can't shine a turd, well, we're proving them wrong!
The goal when envisioning the final product has been multifaceted:
1. We need to stick to a tight budget and a tight time frame;
2. Things need to be done correctly and nicely, but not perfectly (for the sake of #1); and
3. In the end, we want to be able to to say that we would live here ourselves.
Through this process there are constant comments about how "it's just a rental" so we don't need to take this or that step...but I disagree for a number of reasons: shortcuts just don’t align with our work-ethic nor our intention for our properties; and I have this illusion that if you take pride in something others are more apt to respect it it (or at least not trash it). Despite all these reasons to "do it right," there have definitely still been times we’ve caught ourselves saying "that's good enough” for sake of time or budget. Take the umpteen million layers of wallpaper that have been painted and plastered over throughout the years...what do you do with that? Take the time to try and strip it all down to the original walls that are, in all probability, literally being held together by said wallpaper? Take the walls down to the studs and re-drywall? Drywall over the walls? We went the stripping/painting route: stripped what would readily strip and got it ready to paint over. The walls may end up looking like glamorized cellulite, but it will be better than when it started, and there is always room for hanging [large] pictures.
In the first 6 months of owning this property, we did the majority of the work to make it inhabital again, and gradually made small improvements between tenants. This past summer, I quit my job (click here for that story) and we took the time COVID “gifted” us, and decided to add a bit more sweat equity. We turned the lower-level 1 bedroom apartment into a 2 bedroom, painted the exterior, and hauled off (literally) 2 tons of bushes and weeds and trees. I also enlisted the help of a couple studmuffins to chop the old shed in 1/2 and stand it up straight. This poor thang has been soaking up all the TLC. Three years later the lovin’ is starting to pay off, and it’s beginning to be something to look at. There’s still a lot that needs to be done. Someday we’ll tackle the bathroom, add a dishwasher, maybe build a bigger deck…but this will be an alright time to take a break real-quick-once.
This new job has been an endless opportunity for learning for me, so before I distract you with comparison photos of the before and afters, there are a few things I’ve learned this time around renovating that could be some handy tips for your own projects, and even $$ savers!
1. Textured walls/ceilings are EXCELLENT for quick patching and covering up mistakes. They are also excellent at using 2x as much paint. Is the extra money for extra paint worth the time saved not sanding spackle? Maybe, maybe not.
2. Clean, clean, clean, then paint: I already said we were going to polish a turd. First try to clean it. It may be time intensive, but a simple cleaning can be a major $$ saver. Some dirt is just too old to be cleaned, though. Sometimes polishing really means "painting." And BAM! Good as new!
3. Painting ceilings sucks, but is a GAME CHANGER.
4. Rent a drywall lift when installing new ceilings because holding a sheet of drywall above your head will really cramp your neck.
5. Reuse parts of the original: rather than faking a classic door frame for the new bedroom, we used the pieces from a different door we removed. We also utilized a discarded door and mounted on sliders to avoid having to frame in a new door casing.
6. Spray paint outlets and switches: first off, they just get nasty after so long and washing can only do so much; secondly, it is a pain and a waste to replace perfectly good outlets and switches just because they don't match the new room colors. We got some good spray paint, made a little hole in a piece of cardboard as a template to avoid messing up the walls, and BA-DA-BING! They are spick-and-span-shiny like new, and they match the new switch plates we got from the ReSource Store.
7. Caulk makes everything better. It fills all the cracks and makes things look clean and new again quickly, and inexpensively. Everyone fixing up a house needs caulk.
8. Keep an eye out for paint sales: Your bomb-diggity local hardware store (shout out to Washburn Hardware & Sport here in Washburn) and Sherwin Williams often have big sales or rebate programs throughout the year. We target those and buy a TON of untinted** paint to have on hand for what ever project may come up next, and save mucho moolah.
9. Buy "used:" Hit up your local ReSource or thrift stores for some great deals on pretty much anything you could need to fix up a house! There are a couple good ones here in Washburn. We got switch-plates (new: $.25), lighting ($5 each), and small appliances ($10) to name a few this time around. Not to mention, we were also able to donate a ton of treasures left in the Little House prior to starting the reno. Another bonus: the proceeds go back to the community!
10. Pick battles: The original hardwoods have a lot of life left in them and we had originally planned on refinishing them. This was one project we were going to hire out to a pro. Turns out time and budget just didn't cut the mustard for this project, but with a couple strategically placed nice rugs, the spaces will look right as rain for the time being. Another battle we decided to let ourselves lose: landscaping. While we can envision a nicely manicured yard with flower beds, the inside was a more important focus area, especially with the impending winter, so I just ripped it all out for now. I’ll put it on next year’s docket; other properties and projects are calling my name!
So here it is! Some of the best “finished for now” before and afters!